IT’S TOOL TIME!
Do you know what a Stamp-a-ma-jig is?

- Do you know what it does?
- If you have one, do you use it?
Have you ever tried to make a row of images but found that some of them came out crooked and and ruined your entire project . . which means you have to start all over . . . and who likes to do that?!
How would you like your images and words straight every time you stamp–aligned exactly where you want them to be? Pick up a Stamp-a-ma-jig and you’ll have perfect alignment each time.
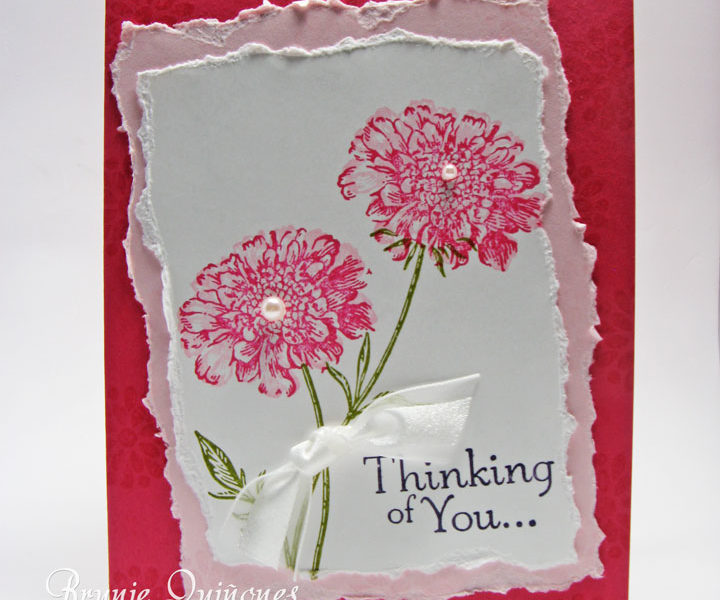
The Stamp-a-ma-jig is a great tool to have and use consistently and yet for some reason people forget to use it. The Stamp-a- a-jig comes with a T-shaped handle and a plastic imaging sheet. It works for right handers as well as left handers. It is washable, has a non-skid base and it is the perfect tool for 2- step stamping. Here’s a card that we made at my recent card class using the Stamp-a-ma-jig.

I used the stamp-a-ma-jig for the flowers – the bold stamp was stamped in one color and the detailed stamp was stamped in another color. I also aligned my sentiment exactly where I wanted it to be.
Although it is the perfect tool when using wood-mount stamps, you can still use your Stamp-a-ma-jig when you use clear-mount blocks. Some times you just need to get a certain image in the precise place and this assures that you will. Just make sure when using the clear-mount blocks that your stamp does not shift otherwise you would have to stamp the image again on the imaging sheet.
So, How Does It Work?
- Align the imaging sheet at the top of the T-shaped Stamp-a-ma-jig, making sure that you have the imaging sheet placed into one corner of the Stamp-a-ma-jig.
- Stamp your image on the imaging sheet, placing the stamp right in the corner of the Stamp-a-ma-jig.
- Decide where you want the stamped image to go on your project and place the imaging sheet on that spot.
- Holding the imaging sheet securely with your hand so it doesn’t shift, place the Stamp-a-ma-jig right on the stamped corner of the imaging sheet.
- Then while holding the Stamp-a-ma-jig, remove the imaging sheet, and place the stamp in the corner of the Stamp-a-ma-jig and stamp your image on your project.
To save time, you can always make permanent image sheets for sets that you use a lot and need a Stamp-a-ma-jig. All you need to do, is get some window sheets and cut them into small squares and using the Stamp-a-ma-jig and Stazon ink, stamp the images from the stamp set on the imaging sheet. Then just store these stamped squares with your stamp set and you’ll be ready to go each time.
So what do you think? Ready to give it a try? You can pick up your own Stamp-a-ma-jig #101049 at my online store. No more crooked images!

[…] Have you ever gone apple picking? It’s fun climbing up the trees to get those apples you think are the best. I had never gone apple picking until 4 years ago when my daughter was in college and we went to visit her during family weekend. She went to school in a beautiful area in NY state where there are plenty of apples to pick – and not to mention the apple cider doughnuts that we ate after we finished picking – loved them! When I saw the apples in the Perfectly Preserved stamp set, it made me think of our apple picking time so I decided to include in the card one of my favorite tree stamps from the Thoughts and Prayer stamp set. I used the Apothecary Accent Framelits to frame the sentiment from Day of Gratitude, which I thought fit perfectly. And I certainly couldn’t pass up the opportunity to use my new Woodgrain Embossing Folder. To line up my apples, I used my trusty Stamp-a-ma-jig – it works great each time. See my post on the Stamp-a-ma-jig here. […]
[…] Flowers Stamp set again – LOVE this stamp set! See more cards with this set here, here, here and here. I sponged with Pear Pizzazz and Blushing Bride (2 returning in- colors from 2010-12!) […]