You just got a new stamp set. If you bought wood-mount, you mounted them and if you bought clear-mount, you’ve removed the paper. So what do you do with the leftover rubber? How about a handmade mosaic stamp?!

How To Make A Mosaic Stamp
Cut up the pieces of rubber into random shapes and glue them unto a wood block for a permanent stamp or simply place your clear-mount rubber on a clear block which you can keep as is or recreate. Make sure to adhere the pieces close to each other with minimal gaps.
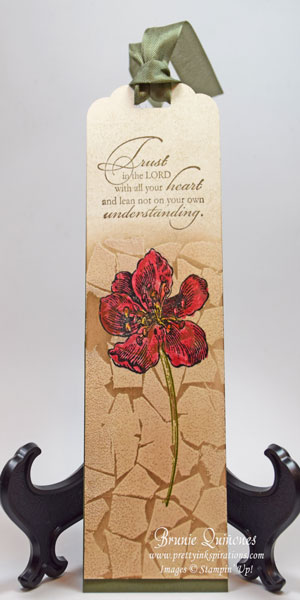
Here I created a bookmark using my own handmade mosaic stamp. I stamped the bookmark twice since my stamp was smaller than the bookmark. I then used the embossing resist method to make sure all the gaps were filled in with color. Can you tell where I missed a spot? With this technique, it really doesn’t matter – I love the look of my brand new stamp. So don’t throw away your rubber scraps and get ready to create your own masterpieces!
What do you think of this bookmark and technique? Leave me a comment.
Buy any of these supplies to make this project and you’ll be able to get a FREE item from the Sale-A-Bration brochure. See it here.
Click here to visit my online store for all your Stampin’ Supplies.
Stamping Supplies: Stamps: Trust God 132094 wood-mount 126702 clear-mount, Everything Eleanor 131987 wood-mount 124164 clear-mount, handmade Mosaic stamp Card Stock: Very Vanilla 101650, Always Artichoke 105199 Ink: Rose Red 126954, Soft Suede 126978, Crushed Curry 131173, Old Olive 126953, VersaMark 102283 Accessories: Scallop Tag Topper Punch 133324, Clear Embossing Powder 109130, Heat Tool 129053, Always Artichoke ribbon, Blender Pens 102845


Your homemade stamp idea is ingenious! I’ve been saving my leftover rubber remnants thinking one day I’ll find some use for them. And then voila! I run across your blog! Thanks for the idea! Your bookmark by the way is gorgeous!
Thank you for your lovely comment Lynn. Have fun creating your own unique stamp!